I am often asked how I am able to get so much done so quickly when I draw and paint. I have a simple formula for “speed” in terms of working from life.
Speed = Accuracy + Efficiency
Accuracy is something you train to achieve by drawing, and specifically by doing exercises that train your accuracy. That can be a different post for later.
What about efficiency? This is something that is also trainable but it’s more of a trial and error thing. In my years of drawing I’ve more or less whittled my basic approach for tonal drawing down to a loose approach that lies on top of a smart structure.
A lot of the structure comes from the tools I use. It’d be easy to mistakenly believe that once you know the right tools to use, you have most of what you need. The truth is, it took years to find the tools I enjoy the most. Many (fun) trips are made to the art supply store trying to find the “perfect” pencil, compressed charcoal, etc.A few of the main things I’m looking for are durability, variety in mark-making, range of tones, and erasability. In order to be most efficient, you would want one that can make rapid changes to the surface, and one that could make subtle changes. You will see that of every type of tool I draw with, I keep at least one hard and soft version of each.
Tools
Vine Charcoals
Nitram Fusains are hard compressed vine charcoals that are good for quick sketching and underdrawings for softer(darker) marks you lay on top of it. Very easy to erase and smudge around as well.

I will tell you about a tool I’ve been using that I’ve been pretty stoked on. They are called Nitram Fusains Soft Round Sticks. They are definitely more expensive than the run-of-the-mill vine charcoal that you find at your neighborhood art supply store, but they handle much differently than them. They are pretty dark when you press firmly into the paper, but they hold their shape when you need a fine line, sort of like a compressed charcoal. The best part is that they are as easy to erase as regular vine charcoal.

The softest vine charcoal I use are the run-of-the-mill willow charcoals you can find at any art store. They are soft and creamy and are easy to manipulate/erase. A little too easy, so you have to be careful to make sure you don’t accidentally smudge away the strokes you make.

Compressed Charcoals
Conte crayons are waxier than other compressed charcoals and thus are harder to erase, but they do stay put (harder to smudge) and are good for drawing sharp lines. Also they are good for putting down tones you want to stay put. That means, tones you don’t plan on smudging up, or erasing.

Your standard compressed charcoal. It can go very dark. It’s very hard to erase but it does smudge and can crumble fairly easily.

Black pastels are the darkest tools in my arsenal. I save it for my darkest darks, or if I need to fill a large shape of darkness quickly.

Pencils
A Lyra Color Giant is a hard, fairly light pencil that keeps its point well. Can get fairly dark if you press down enough, but also very light and exact with the point.

Black Carbothellos are good tools as well. It’s probably medium on the scale of lightest and darkest. Since it’s carbon, it has a bit more coarseness than regular charcoal, but can still get reasonably dark.
Ritmo Charcoal pencils get pretty dark. I think the 3B’s are the darkest ones you can get. I like Ritmos because they don’t get those spots in the lead where it feels “rocky.” General’s pencils are the biggest offenders.

Smudging Tools
I like to have different ways of manipulating the marks I have already put down. This is a lot of the reason I can get a lot in a short amount of time. The softer the brush the more subtle the gradations you can get out of them.


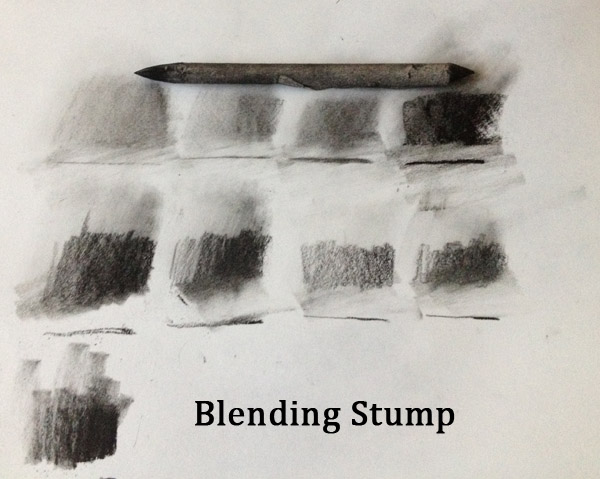
The blending stump is one of my most important tools. It flattens out some of the texture and draws out shades from the tone. The reason I like to use it so much is because of the subtlety in the rendering possible with it. It can make the stump into a drawing tool itself. It can make hard edges into soft, which is what I mostly use it for. A lot the efficiency is simply “edge conversion.” Most strokes by default have sharp edges on at least one or two sides. Using a blending stump is the most controllable way to soften edges.
Erasers
I use erasers not so much to correct mistakes but as a drawing tool themselves. If charcoal is an additive medium, then an eraser is a subtractive medium. It makes the white of the paper into a mark of its own. You can create a white simply by surrounding it with black.

My main eraser is a kneaded eraser. It’s so versatile because it can be made into any shape. It is mostly used by me to create soft edges by lightly erasing tones. Erasers are the second part to my “edge conversion” concept. Whereas brushes and blending stumps make hard edges soft, erasers can make soft edges hard. This can be very useful when creating definite shapes out of soft tones.
•
These 3-minute drawings were done with the Nitram soft rounds. They combine the best of vine and compressed charcoals in a single tool. Efficiency!

5 minutes each.


This small 10 minute drawing was my favorite of the night. I quickly marked in the landmarks of the shapes and then roughed in the core shadows. I then filled in all the shadow shapes and used the blending stump to bring the light and shadow sides together.

These next few drawings were made almost exclusively with the Lyra Color Giant.


Working on toned paper is almost the same thing, the main difference is instead of relying on the paper for whites, you use white chalks for highlights. Gray papers tend to grip the charcoal better, making certain techniques harder to pull off quickly, but other more straightforward approaches work well.

A 20 minute drawing that was mostly shaded in by using vine charcoal and blending stumps, then erasing the “spillover” from the boundary of the model’s body.

My favorite way of working is a mixture of tonal and linear drawing. As evidenced in these quick 3-minute drawings, I use a few different tools even for the quick ones if I need to.

These quick 10-minute drawings are made possible by the efficiency of the approach. Once you lay down the initial strokes and tones, you set yourself up for smudging tones with your brush and blender. You can get an astonishing amount of subtle gradation very quickly. Once you erase the excess you get a handsome result in no time.

This was a 20-minute drawing that is almost all tonal. Throwing in some well-chosen outlines gives it a nice ‘pop’ when it counts.


Another drawing on toned paper. This time using sanguine chalk for the reddish tones. Adding red on top of black and white adds a whole extra dimension of color temperature. You can either exploit this for extra impact or just treat it as a different color for monochromatic drawing.

To really drive the point home, here are some gesture drawings that show the tools in action. Almost totally unedited and shown in real-time.
3 Minute Gesture Drawing: Nicole - http://www.youtube.com/watch?v=0jHOIUeX9pc
5-minute gesture drawing: Nicole – http://youtu.be/Z7w8tty6EEM
10-minute gesture drawing: Jessica - http://youtu.be/dQ4YLtjQL3M
20-minute gesture drawing: Angge - http://youtu.be/_ALelYgd9F0Landscape Drawings in Charcoal
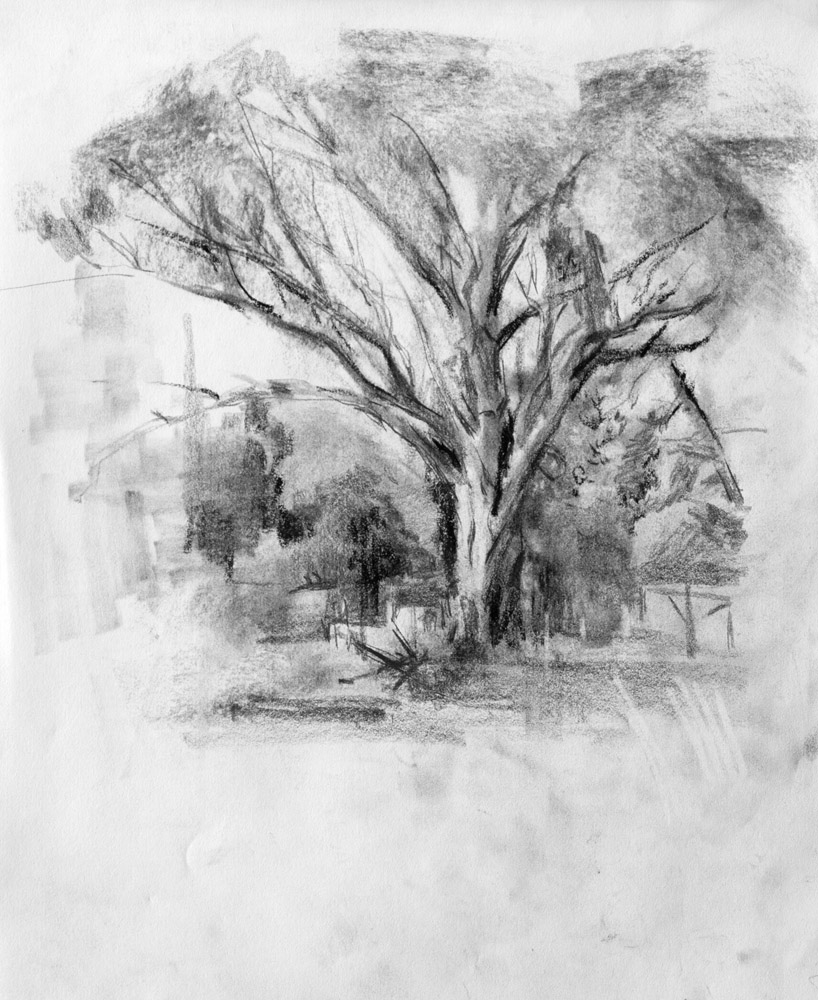
As a bonus, I am putting up some landscape drawings that I’ve been doing in the field lately. I think since drawing is more important than painting and value is more important than color, it’s critical that we as artists develop this side of our technique as much as we can. Without paint and brushwork in the way, this practice gives a much more honest depiction on where we stand in terms of skill. I wish more artists would share the landscape drawings they do.


•
NewsletterTumblr
Drawings For Sale
Prints For Sale
Google+